Martin Lawrence Photography
How to use a 10-Stop ND Filter to capture slow moving water shots
Posted on 21st March, 2018
Lots of people have asked me How to use a 10-Stop ND Filter to capture slow moving water shots. Whilst there are two main variables that do not make its use an exact science - available light and flow of water - there are a few basic principles that you will need to stick to if you want success. Although your 10-stop ND Filter filter has many uses, this article will concentrate on how to use it to capture slow moving water shots.
Now you’ve got it what do you do with it?
If you were like me you most probably have anxiously waited a couple of months for your 10-Stop ND Filter to hit the doorstep. Everyone in your circle of photography friends has talked about it and now it’s arrived you’re unsure of how to use it properly. This short article will go some way towards you getting a lot of fabulous images and making you feel as though you have definitely purchased wisely.
10-Stop ND Filter uses
A 10-Stop filter is a long exposure filter that reduces the amount of light entering your lens by approximately ten stops. This gives you a broad scope to create incredible images using slow shutter speeds or wide apertures.
The main use for a 10-Stop ND Filter is making everything that is moving within your image blurred and ghost-like and is very effective on water especially on waterfalls, rivers and streams and the sea. They can also be used within the city environment when photographing cityscapes and traffic where you want to remove people etc.. But as I mainly use my 10 stop filter for landscapes then this is what I am going to concentrate on within this article.
Positioning of your 10-Stop ND Filter
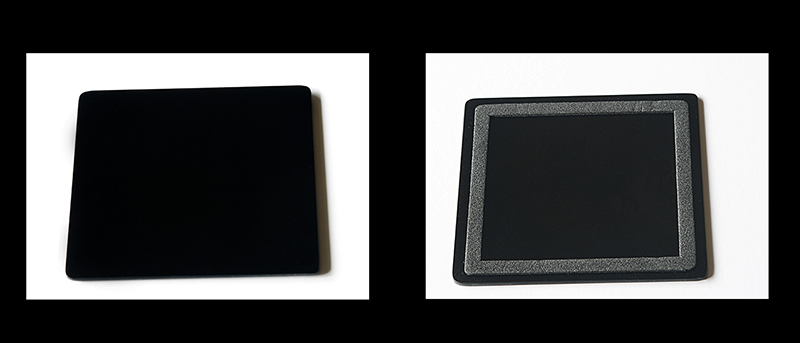
The two images below show you both sides of the 10-Stop ND Filter. The first image shows how dark the actual filter is and the second shows you the sponge seal that is used to seal the filter against the filter holder. You must make sure that all of the sponge is firmly positioned around all of the filter holder and positioned evenly on to the holder.

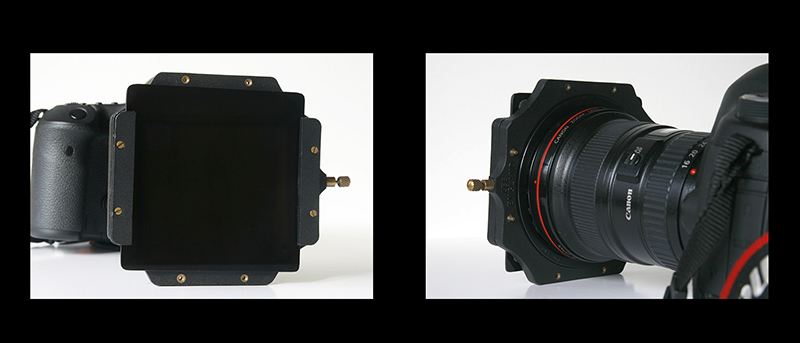
Correct positioning of the filter is crucial to getting great results. If this is not positioned correctly then, due to the very slow shutter speeds you will be using, light can leak into the image and cause orange overexposed areas around the perimeters of the filter. The images below show the correct positioning of the filter on the filter holder.

Focusing Issues
Due to the strength and darkness of the 10-Stop ND Filter, you cannot expect your lens to pick up and focus on anything within your image after it has been positioned; therefore you will always need to pre-focus before correctly placing your filter as described in the, above paragraph. After focusing and positioning your filter, you can now switch your lens to manual focus which will stop your lens ‘hunting’ as a focusing point when taking your image. There is, however, one exception to the above. If your camera has exposure simulation within ‘live view’ then you should be able to reduce the shutter speed to a slow enough speed giving you a correct exposure that should make your image appear on your screen which will then allow your lens to focus automatically. This again is really crucial to obtain great images. My preferred method of working is to shoot in manual mode at F11 and set my camera to Exposure Simulation within ‘live view’ and set my lens to autofocus.
Water movement and shutter speeds
Generally speaking the slower the water movement the slower the shutter speed needs to be to obtain that ‘milky’ effect we want to achieve. A word of warning, if you’re photographing fast ‘white’ water then if you shoot on too slow a shutter speed then it’s very easy just to capture a mass of overexposed white areas that are not very complimentary. So when you’re checking out suitable areas to use your 10 stop filter just bear in mind that you want to photograph moving water that doesn’t contain too much ‘white’ water to get your best results. Even very slow moving water can look great if you shoot it at very slow shutter speeds. Over the years, I have found the best shutter speeds have been between 2 seconds and 8 seconds but again I must emphasise that it’s all to do with the light conditions and the speed of the water. Obviously, with these sorts of shutter speeds, a tripod is an essential piece of kit and these kinds of shots should not be attempted without one. A remote release or shutter release cable is also invaluable to obtain good crisp images. For more information see the Checking Results paragraph below.
Colour Cast
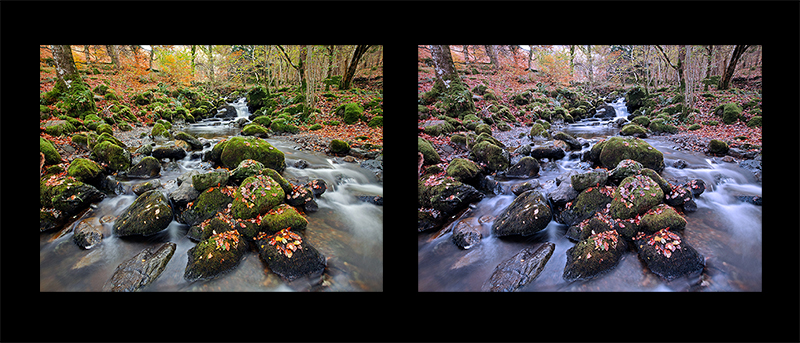
When you start to use your 10 stop filter you may see a ‘blue cast’ to your images as shown in the second image below. This is normal and can be corrected. Correction is all to do with ‘White Balance’. There is only one word that explains white balance and that is Temperature. It’s calculated on the Kelvin scale where Sunny is around 5200K, Cloudy is around 6200K and Shade around 7200K and these can be set under the White Balance category within your menu structure. Unfortunately, Shade at 7200K is sometimes still not warm enough to reduce that colour cast. Nearly all DSLRs have a setting within the White Balance menu structure that allows the user to set their own value within the Kelvin scale. Again, this is to do with personal preference but I think a setting of around 9000K gives the best results. As this is under your own control then please experiment around this figure to give the results that are to your own liking. The first image is an image that I took near Ashness Bridge one autumn day and used a Lee Big Stopper (10-Stop ND Filter). It was taken at ISO 800 at F11 at a shutter speed of 6 seconds with a white balance set to 9000K.

Conclusion
Getting your milky effect water, is I’m afraid, not an exact science but given the right starting point and the knowledge to know what to do if you’re not getting the right effect you want with your 10-Stop ND Filter can get you some stunning images that you will be very proud of. Some people love this effect and some people hate it but now you’ve purchased the 10-Stop ND Filter this article will hopefully go some way towards you obtaining these classic images that in my opinion can look very effective when used on the right location.
Why not join me or one of my 1-2-1 or small group workshops or, if you want specific Photoshop training, check out my 1-2-1 Adobe CC Photoshop Tuition for Photographers.
© Martin Lawrence Photography 2018
